A Minimal Rust Kernel
In this post, we create a minimal 64-bit Rust kernel for the x86 architecture. We build upon the freestanding Rust binary from the previous post to create a bootable disk image that prints something to the screen.
This blog is openly developed on GitHub. If you have any problems or questions, please open an issue there. You can also leave comments at the bottom. The complete source code for this post can be found in the post-02 branch.
Table of Contents
🔗The Boot Process
When you turn on a computer, it begins executing firmware code that is stored in motherboard ROM. This code performs a power-on self-test, detects available RAM, and pre-initializes the CPU and hardware. Afterwards, it looks for a bootable disk and starts booting the operating system kernel.
On x86, there are two firmware standards: the “Basic Input/Output System“ (BIOS) and the newer “Unified Extensible Firmware Interface” (UEFI). The BIOS standard is old and outdated, but simple and well-supported on any x86 machine since the 1980s. UEFI, in contrast, is more modern and has much more features, but is more complex to set up (at least in my opinion).
Currently, we only provide BIOS support, but support for UEFI is planned, too. If you’d like to help us with this, check out the Github issue.
🔗BIOS Boot
Almost all x86 systems have support for BIOS booting, including newer UEFI-based machines that use an emulated BIOS. This is great, because you can use the same boot logic across all machines from the last century. But this wide compatibility is at the same time the biggest disadvantage of BIOS booting, because it means that the CPU is put into a 16-bit compatibility mode called real mode before booting so that archaic bootloaders from the 1980s would still work.
But let’s start from the beginning:
When you turn on a computer, it loads the BIOS from some special flash memory located on the motherboard. The BIOS runs self-test and initialization routines of the hardware, then it looks for bootable disks. If it finds one, control is transferred to its bootloader, which is a 512-byte portion of executable code stored at the disk’s beginning. Most bootloaders are larger than 512 bytes, so bootloaders are commonly split into a small first stage, which fits into 512 bytes, and a second stage, which is subsequently loaded by the first stage.
The bootloader has to determine the location of the kernel image on the disk and load it into memory. It also needs to switch the CPU from the 16-bit real mode first to the 32-bit protected mode, and then to the 64-bit long mode, where 64-bit registers and the complete main memory are available. Its third job is to query certain information (such as a memory map) from the BIOS and pass it to the OS kernel.
Writing a bootloader is a bit cumbersome as it requires assembly language and a lot of non insightful steps like “write this magic value to this processor register”. Therefore, we don’t cover bootloader creation in this post and instead provide a tool named bootimage that automatically prepends a bootloader to your kernel.
If you are interested in building your own bootloader: Stay tuned, a set of posts on this topic is already planned!
🔗The Multiboot Standard
To avoid that every operating system implements its own bootloader, which is only compatible with a single OS, the Free Software Foundation created an open bootloader standard called Multiboot in 1995. The standard defines an interface between the bootloader and the operating system, so that any Multiboot-compliant bootloader can load any Multiboot-compliant operating system. The reference implementation is GNU GRUB, which is the most popular bootloader for Linux systems.
To make a kernel Multiboot compliant, one just needs to insert a so-called Multiboot header at the beginning of the kernel file. This makes it very easy to boot an OS from GRUB. However, GRUB and the Multiboot standard have some problems too:
- They support only the 32-bit protected mode. This means that you still have to do the CPU configuration to switch to the 64-bit long mode.
- They are designed to make the bootloader simple instead of the kernel. For example, the kernel needs to be linked with an adjusted default page size, because GRUB can’t find the Multiboot header otherwise. Another example is that the boot information, which is passed to the kernel, contains lots of architecture-dependent structures instead of providing clean abstractions.
- Both GRUB and the Multiboot standard are only sparsely documented.
- GRUB needs to be installed on the host system to create a bootable disk image from the kernel file. This makes development on Windows or Mac more difficult.
Because of these drawbacks, we decided to not use GRUB or the Multiboot standard. However, we plan to add Multiboot support to our bootimage tool, so that it’s possible to load your kernel on a GRUB system too. If you’re interested in writing a Multiboot compliant kernel, check out the first edition of this blog series.
🔗UEFI
(We don’t provide UEFI support at the moment, but we would love to! If you’d like to help, please tell us in the Github issue.)
🔗A Minimal Kernel
Now that we roughly know how a computer boots, it’s time to create our own minimal kernel. Our goal is to create a disk image that prints a “Hello World!” to the screen when booted. We do this by extending the previous post’s freestanding Rust binary.
As you may remember, we built the freestanding binary through cargo, but depending on the operating system, we needed different entry point names and compile flags. That’s because cargo builds for the host system by default, i.e., the system you’re running on. This isn’t something we want for our kernel, because a kernel that runs on top of, e.g., Windows, does not make much sense. Instead, we want to compile for a clearly defined target system.
🔗Installing Rust Nightly
Rust has three release channels: stable, beta, and nightly. The Rust Book explains the difference between these channels really well, so take a minute and check it out. For building an operating system, we will need some experimental features that are only available on the nightly channel, so we need to install a nightly version of Rust.
To manage Rust installations, I highly recommend rustup. It allows you to install nightly, beta, and stable compilers side-by-side and makes it easy to update them. With rustup, you can use a nightly compiler for the current directory by running rustup override set nightly. Alternatively, you can add a file called rust-toolchain with the content nightly to the project’s root directory. You can check that you have a nightly version installed by running rustc --version: The version number should contain -nightly at the end.
The nightly compiler allows us to opt-in to various experimental features by using so-called feature flags at the top of our file. For example, we could enable the experimental asm! macro for inline assembly by adding #![feature(asm)] to the top of our main.rs. Note that such experimental features are completely unstable, which means that future Rust versions might change or remove them without prior warning. For this reason, we will only use them if absolutely necessary.
🔗Target Specification
Cargo supports different target systems through the --target parameter. The target is described by a so-called target triple, which describes the CPU architecture, the vendor, the operating system, and the ABI. For example, the x86_64-unknown-linux-gnu target triple describes a system with an x86_64 CPU, no clear vendor, and a Linux operating system with the GNU ABI. Rust supports many different target triples, including arm-linux-androideabi for Android or wasm32-unknown-unknown for WebAssembly.
For our target system, however, we require some special configuration parameters (e.g. no underlying OS), so none of the existing target triples fits. Fortunately, Rust allows us to define our own target through a JSON file. For example, a JSON file that describes the x86_64-unknown-linux-gnu target looks like this:
{
    "llvm-target": "x86_64-unknown-linux-gnu",
    "data-layout": "e-m:e-p270:32:32-p271:32:32-p272:64:64-i64:64-i128:128-f80:128-n8:16:32:64-S128",
    "arch": "x86_64",
    "target-endian": "little",
    "target-pointer-width": 64,
    "target-c-int-width": 32,
    "os": "linux",
    "executables": true,
    "linker-flavor": "gcc",
    "pre-link-args": ["-m64"],
    "morestack": false
}
Most fields are required by LLVM to generate code for that platform. For example, the data-layout field defines the size of various integer, floating point, and pointer types. Then there are fields that Rust uses for conditional compilation, such as target-pointer-width. The third kind of field defines how the crate should be built. For example, the pre-link-args field specifies arguments passed to the linker.
We also target x86_64 systems with our kernel, so our target specification will look very similar to the one above. Let’s start by creating an x86_64-blog_os.json file (choose any name you like) with the common content:
{
    "llvm-target": "x86_64-unknown-none",
    "data-layout": "e-m:e-p270:32:32-p271:32:32-p272:64:64-i64:64-i128:128-f80:128-n8:16:32:64-S128",
    "arch": "x86_64",
    "target-endian": "little",
    "target-pointer-width": 64,
    "target-c-int-width": 32,
    "os": "none",
    "executables": true
}
Note that we changed the OS in the llvm-target and the os field to none, because we will run on bare metal.
We add the following build-related entries:
"linker-flavor": "ld.lld",
"linker": "rust-lld",
Instead of using the platform’s default linker (which might not support Linux targets), we use the cross-platform LLD linker that is shipped with Rust for linking our kernel.
"panic-strategy": "abort",This setting specifies that the target doesn’t support stack unwinding on panic, so instead the program should abort directly. This has the same effect as the panic = "abort" option in our Cargo.toml, so we can remove it from there. (Note that, in contrast to the Cargo.toml option, this target option also applies when we recompile the core library later in this post. So, even if you prefer to keep the Cargo.toml option, make sure to include this option.)
"disable-redzone": true,We’re writing a kernel, so we’ll need to handle interrupts at some point. To do that safely, we have to disable a certain stack pointer optimization called the “red zone”, because it would cause stack corruption otherwise. For more information, see our separate post about disabling the red zone.
"features": "-mmx,-sse,+soft-float",The features field enables/disables target features. We disable the mmx and sse features by prefixing them with a minus and enable the soft-float feature by prefixing it with a plus. Note that there must be no spaces between different flags, otherwise LLVM fails to interpret the features string.
The mmx and sse features determine support for Single Instruction Multiple Data (SIMD) instructions, which can often speed up programs significantly. However, using the large SIMD registers in OS kernels leads to performance problems. The reason is that the kernel needs to restore all registers to their original state before continuing an interrupted program. This means that the kernel has to save the complete SIMD state to main memory on each system call or hardware interrupt. Since the SIMD state is very large (512–1600 bytes) and interrupts can occur very often, these additional save/restore operations considerably harm performance. To avoid this, we disable SIMD for our kernel (not for applications running on top!).
A problem with disabling SIMD is that floating point operations on x86_64 require SIMD registers by default. To solve this problem, we add the soft-float feature, which emulates all floating point operations through software functions based on normal integers.
For more information, see our post on disabling SIMD.
"rustc-abi": "softfloat"As we want to use the soft-float feature, we also need to tell the Rust compiler rustc that we want to use the corresponding ABI. We can do that by setting the rustc-abi field to softfloat.
🔗Putting it Together
Our target specification file now looks like this:
{
    "llvm-target": "x86_64-unknown-none",
    "data-layout": "e-m:e-p270:32:32-p271:32:32-p272:64:64-i64:64-i128:128-f80:128-n8:16:32:64-S128",
    "arch": "x86_64",
    "target-endian": "little",
    "target-pointer-width": 64,
    "target-c-int-width": 32,
    "os": "none",
    "executables": true,
    "linker-flavor": "ld.lld",
    "linker": "rust-lld",
    "panic-strategy": "abort",
    "disable-redzone": true,
    "features": "-mmx,-sse,+soft-float",
    "rustc-abi": "softfloat"
}🔗Building our Kernel
Compiling for our new target will use Linux conventions, since the ld.lld linker-flavor instructs llvm to compile with the -flavor gnu flag (for more linker options, see the rustc documentation). This means that we need an entry point named _start as described in the previous post:
// src/main.rs

#![no_std] // don't link the Rust standard library
#![no_main] // disable all Rust-level entry points

use core::panic::PanicInfo;

/// This function is called on panic.
#[panic_handler]
fn panic(_info: &PanicInfo) -> ! {
    loop {}
}

#[unsafe(no_mangle)] // don't mangle the name of this function
pub extern "C" fn _start() -> ! {
    // this function is the entry point, since the linker looks for a function
    // named `_start` by default
    loop {}
}
Note that the entry point needs to be called _start regardless of your host OS.
We can now build the kernel for our new target by passing the name of the JSON file as --target:
> cargo build --target x86_64-blog_os.json

error: `.json` target specs require -Zjson-target-spec
It fails! The error tells us that custom JSON target specifications are an unstable feature that requires explicit opt-in. This is because the format of the JSON target files is not considered stable yet, so changes to it might occur in future versions of Rust. See the tracking issue for custom JSON target specs for more information.
🔗The json-target-spec Option
To enable support for custom JSON target specifications, we need to create a local cargo configuration file at .cargo/config.toml (the .cargo folder should be next to your src folder) with the following content:
# in .cargo/config.toml

[unstable]
json-target-spec = true
This enables the unstable json-target-spec feature, allowing us to use custom JSON target files.
With this configuration in place, let’s try building again:
> cargo build --target x86_64-blog_os.json

error[E0463]: can't find crate for `core`
It still fails, but with a new error. The error tells us that the Rust compiler does not find the core library. This library contains basic Rust types such as Result, Option, and iterators, and is implicitly linked to all no_std crates.
The problem is that the core library is distributed together with the Rust compiler as a precompiled library. So it is only valid for supported host triples (e.g., x86_64-unknown-linux-gnu) but not for our custom target. If we want to compile code for other targets, we need to recompile core for these targets first.
🔗The build-std Option
That’s where the build-std feature of cargo comes in. It allows to recompile core and other standard library crates on demand, instead of using the precompiled versions shipped with the Rust installation. This feature is very new and still not finished, so it is marked as “unstable” and only available on nightly Rust compilers.
To use the feature, we need to add the following to our cargo configuration file at .cargo/config.toml:
# in .cargo/config.toml

[unstable]
json-target-spec = true
build-std = ["core", "compiler_builtins"]
This tells cargo that it should recompile the core and compiler_builtins libraries. The latter is required because it is a dependency of core. In order to recompile these libraries, cargo needs access to the rust source code, which we can install with rustup component add rust-src.
Note: The unstable.build-std configuration key requires at least the Rust nightly from 2020-07-15.
After setting the unstable.build-std configuration key and installing the rust-src component, we can rerun our build command:
> cargo build --target x86_64-blog_os.json
   Compiling core v0.0.0 (/…/rust/src/libcore)
   Compiling rustc-std-workspace-core v1.99.0 (/…/rust/src/tools/rustc-std-workspace-core)
   Compiling compiler_builtins v0.1.32
   Compiling blog_os v0.1.0 (/…/blog_os)
    Finished dev [unoptimized + debuginfo] target(s) in 0.29 secs
We see that cargo build now recompiles the core, rustc-std-workspace-core (a dependency of compiler_builtins), and compiler_builtins libraries for our custom target.
🔗Memory-Related Intrinsics
The Rust compiler assumes that a certain set of built-in functions is available for all systems. Most of these functions are provided by the compiler_builtins crate that we just recompiled. However, there are some memory-related functions in that crate that are not enabled by default because they are normally provided by the C library on the system. These functions include memset, which sets all bytes in a memory block to a given value, memcpy, which copies one memory block to another, and memcmp, which compares two memory blocks. While we didn’t need any of these functions to compile our kernel right now, they will be required as soon as we add some more code to it (e.g. when copying structs around).
Since we can’t link to the C library of the operating system, we need an alternative way to provide these functions to the compiler. One possible approach for this could be to implement our own memset etc. functions and apply the #[unsafe(no_mangle)] attribute to them (to avoid the automatic renaming during compilation). However, this is dangerous since the slightest mistake in the implementation of these functions could lead to undefined behavior. For example, implementing memcpy with a for loop may result in an infinite recursion because for loops implicitly call the IntoIterator::into_iter trait method, which may call memcpy again. So it’s a good idea to reuse existing, well-tested implementations instead.
Fortunately, the compiler_builtins crate already contains implementations for all the needed functions, they are just disabled by default to not collide with the implementations from the C library. We can enable them by setting cargo’s build-std-features flag to ["compiler-builtins-mem"]. Like the build-std flag, this flag can be either passed on the command line as a -Z flag or configured in the unstable table in the .cargo/config.toml file. Since we always want to build with this flag, the config file option makes more sense for us:
# in .cargo/config.toml

[unstable]
json-target-spec = true
build-std-features = ["compiler-builtins-mem"]
build-std = ["core", "compiler_builtins"]
(Support for the compiler-builtins-mem feature was only added very recently, so you need at least Rust nightly 2020-09-30 for it.)
Behind the scenes, this flag enables the mem feature of the compiler_builtins crate. The effect of this is that the #[unsafe(no_mangle)] attribute is applied to the memcpy etc. implementations of the crate, which makes them available to the linker.
With this change, our kernel has valid implementations for all compiler-required functions, so it will continue to compile even if our code gets more complex.
🔗Set a Default Target
To avoid passing the --target parameter on every invocation of cargo build, we can override the default target. To do this, we add the following to our cargo configuration file at .cargo/config.toml:
# in .cargo/config.toml

[build]
target = "x86_64-blog_os.json"
This tells cargo to use our x86_64-blog_os.json target when no explicit --target argument is passed. This means that we can now build our kernel with a simple cargo build. For more information on cargo configuration options, check out the official documentation.
We are now able to build our kernel for a bare metal target with a simple cargo build. However, our _start entry point, which will be called by the boot loader, is still empty. It’s time that we output something to screen from it.
🔗Printing to Screen
The easiest way to print text to the screen at this stage is the VGA text buffer. It is a special memory area mapped to the VGA hardware that contains the contents displayed on screen. It normally consists of 25 lines that each contain 80 character cells. Each character cell displays an ASCII character with some foreground and background colors. The screen output looks like this:

We will discuss the exact layout of the VGA buffer in the next post, where we write a first small driver for it. For printing “Hello World!”, we just need to know that the buffer is located at address 0xb8000 and that each character cell consists of an ASCII byte and a color byte.
The implementation looks like this:
static HELLO: &[u8] = b"Hello World!";

#[unsafe(no_mangle)]
pub extern "C" fn _start() -> ! {
    let vga_buffer = 0xb8000 as *mut u8;

    for (i, &byte) in HELLO.iter().enumerate() {
        unsafe {
            *vga_buffer.offset(i as isize * 2) = byte;
            *vga_buffer.offset(i as isize * 2 + 1) = 0xb;
        }
    }

    loop {}
}
First, we cast the integer 0xb8000 into a raw pointer. Then we iterate over the bytes of the static HELLO byte string. We use the enumerate method to additionally get a running variable i. In the body of the for loop, we use the offset method to write the string byte and the corresponding color byte (0xb is a light cyan).
Note that there’s an unsafe block around all memory writes. The reason is that the Rust compiler can’t prove that the raw pointers we create are valid. They could point anywhere and lead to data corruption. By putting them into an unsafe block, we’re basically telling the compiler that we are absolutely sure that the operations are valid. Note that an unsafe block does not turn off Rust’s safety checks. It only allows you to do five additional things.
I want to emphasize that this is not the way we want to do things in Rust! It’s very easy to mess up when working with raw pointers inside unsafe blocks. For example, we could easily write beyond the buffer’s end if we’re not careful.
So we want to minimize the use of unsafe as much as possible. Rust gives us the ability to do this by creating safe abstractions. For example, we could create a VGA buffer type that encapsulates all unsafety and ensures that it is impossible to do anything wrong from the outside. This way, we would only need minimal amounts of unsafe code and can be sure that we don’t violate memory safety. We will create such a safe VGA buffer abstraction in the next post.
🔗Running our Kernel
Now that we have an executable that does something perceptible, it is time to run it. First, we need to turn our compiled kernel into a bootable disk image by linking it with a bootloader. Then we can run the disk image in the QEMU virtual machine or boot it on real hardware using a USB stick.
🔗Creating a Bootimage
To turn our compiled kernel into a bootable disk image, we need to link it with a bootloader. As we learned in the section about booting, the bootloader is responsible for initializing the CPU and loading our kernel.
Instead of writing our own bootloader, which is a project on its own, we use the bootloader crate. This crate implements a basic BIOS bootloader without any C dependencies, just Rust and inline assembly. To use it for booting our kernel, we need to add a dependency on it:
# in Cargo.toml

[dependencies]
bootloader = "0.9"
Note: This post is only compatible with bootloader v0.9. Newer versions use a different build system and will result in build errors when following this post.
Adding the bootloader as a dependency is not enough to actually create a bootable disk image. The problem is that we need to link our kernel with the bootloader after compilation, but cargo has no support for post-build scripts.
To solve this problem, we created a tool named bootimage that first compiles the kernel and bootloader, and then links them together to create a bootable disk image. To install the tool, go into your home directory (or any directory outside of your cargo project) and execute the following command in your terminal:
cargo install bootimageFor running bootimage and building the bootloader, you need to have the llvm-tools-preview rustup component installed. You can do so by executing rustup component add llvm-tools-preview.
After installing bootimage and adding the llvm-tools-preview component, you can create a bootable disk image by going back into your cargo project directory and executing:
> cargo bootimageWe see that the tool recompiles our kernel using cargo build, so it will automatically pick up any changes you make. Afterwards, it compiles the bootloader, which might take a while. Like all crate dependencies, it is only built once and then cached, so subsequent builds will be much faster. Finally, bootimage combines the bootloader and your kernel into a bootable disk image.
After executing the command, you should see a bootable disk image named bootimage-blog_os.bin in your target/x86_64-blog_os/debug directory. You can boot it in a virtual machine or copy it to a USB drive to boot it on real hardware. (Note that this is not a CD image, which has a different format, so burning it to a CD doesn’t work).
🔗How does it work?
The bootimage tool performs the following steps behind the scenes:
- It compiles our kernel to an ELF file.
- It compiles the bootloader dependency as a standalone executable.
- It links the bytes of the kernel ELF file to the bootloader.
When booted, the bootloader reads and parses the appended ELF file. It then maps the program segments to virtual addresses in the page tables, zeroes the .bss section, and sets up a stack. Finally, it reads the entry point address (our _start function) and jumps to it.
🔗Booting it in QEMU
We can now boot the disk image in a virtual machine. To boot it in QEMU, execute the following command:
> qemu-system-x86_64 -drive format=raw,file=target/x86_64-blog_os/debug/bootimage-blog_os.binThis opens a separate window which should look similar to this:
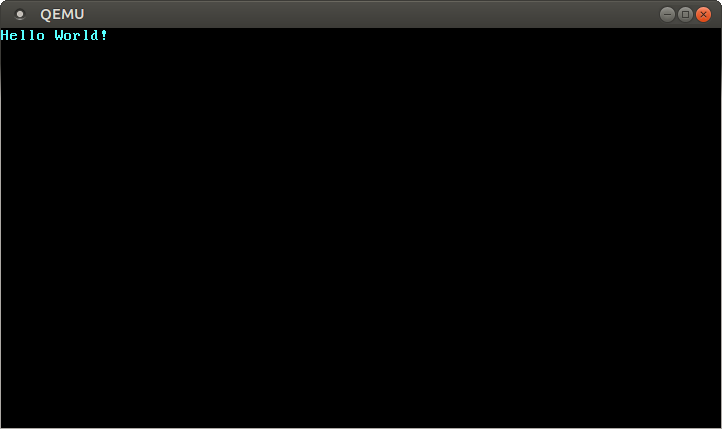
We see that our “Hello World!” is visible on the screen.
🔗Real Machine
It is also possible to write it to a USB stick and boot it on a real machine, but be careful to choose the correct device name, because everything on that device is overwritten:
> dd if=target/x86_64-blog_os/debug/bootimage-blog_os.bin of=/dev/sdX && syncWhere sdX is the device name of your USB stick.
After writing the image to the USB stick, you can run it on real hardware by booting from it. You probably need to use a special boot menu or change the boot order in your BIOS configuration to boot from the USB stick. Note that it currently doesn’t work for UEFI machines, since the bootloader crate has no UEFI support yet.
🔗Using cargo run
To make it easier to run our kernel in QEMU, we can set the runner configuration key for cargo:
# in .cargo/config.toml

[target.'cfg(target_os = "none")']
runner = "bootimage runner"
The target.'cfg(target_os = "none")' table applies to all targets whose target configuration file’s "os" field is set to "none". This includes our x86_64-blog_os.json target. The runner key specifies the command that should be invoked for cargo run. The command is run after a successful build with the executable path passed as the first argument. See the cargo documentation for more details.
The bootimage runner command is specifically designed to be usable as a runner executable. It links the given executable with the project’s bootloader dependency and then launches QEMU. See the Readme of bootimage for more details and possible configuration options.
Now we can use cargo run to compile our kernel and boot it in QEMU.
🔗What’s next?
In the next post, we will explore the VGA text buffer in more detail and write a safe interface for it. We will also add support for the println macro.
Comments
Do you have a problem, want to share feedback, or discuss further ideas? Feel free to leave a comment here! Please stick to English and follow Rust's code of conduct. This comment thread directly maps to a discussion on GitHub, so you can also comment there if you prefer.
Instead of authenticating the giscus application, you can also comment directly on GitHub.